Getting Started with xUnit.net v2 2025 July 4
Note
Core Framework v2 is in maintenance mode. Critical bug fixes will be issued, but no new feature work is being done. All new features are taking place with Core Framework v3 only. Developers are encouraged to upgrade from v2 to v3 at their earliest convenience.
In this document, we will demonstrate getting started with xUnit.net v2 when targeting .NET 8 (or later) and/or .NET Framework 4.7.2 (or later), showing you how to write and run your first set of unit tests. We will be using the .NET SDK command line.
Note
The examples were done with C#, xUnit.net v2 2.9.3, .NET SDK 9.0.301, and .NET 8. The version numbers, paths, and generated templates may differ for you, depending on the versions you're using. The instructions for .NET vs. .NET Framework are identical other than picking the appropriate target framework; however, being able to build and run .NET Framework tests on Linux or macOS requires installing Mono first. See the Multi-targeting with non-Windows OSes documentation for more information.
Download the .NET SDK
The .NET SDK is available for download for Windows, Linux, and macOS.
Once you've downloaded and installed the SDK, open a fresh command prompt of your choice (CMD, PowerShell, bash, etc.) and make sure that you can access the command line by typing dotnet --version. You should be rewarded with a single line, describing the version of the .NET SDK you have installed:
$ dotnet --version
9.0.301
Note
The first time you run the dotnet command, it may perform some post-installation steps. Once these one-time actions are done, it will execute your command.
Create the unit test project
From the command line, create a folder for your test project, change into it, and then create the project using dotnet new:
$ mkdir MyFirstUnitTests
$ cd MyFirstUnitTests
$ dotnet new xunit
The template "xUnit.net Test Project" was created successfully.

Processing post-creation actions...
Restoring .../MyFirstUnitTests/MyFirstUnitTests.csproj:
Restore succeeded.
The generated project file should look something like this:
<Project Sdk="Microsoft.NET.Sdk">

  <PropertyGroup>
    <TargetFramework>net8.0</TargetFramework>
    <ImplicitUsings>enable</ImplicitUsings>
    <Nullable>enable</Nullable>
    <IsPackable>false</IsPackable>
  </PropertyGroup>

  <ItemGroup>
    <PackageReference Include="Microsoft.NET.Test.Sdk" Version="17.13.0" />
    <PackageReference Include="xunit" Version="2.9.3" />
    <PackageReference Include="xunit.runner.visualstudio" Version="3.1.1" />
  </ItemGroup>

  <ItemGroup>
    <Using Include="Xunit" />
  </ItemGroup>

</Project>
Let's quickly review what's in this project file:
ImplicitUsingsenables implicitusingstatements in your project. In addition to the default set of implicitusingstatements, you can see below that we've added an implicitusingfor theXunitnamespace where the most common xUnit.net types come from. More information about implicit usingsNullableis enabled in this default template. Our libraries including nullable annotations to help you find when you may be accidentally dealing withnullvalues. For example,Assert.NotNullis decorated in such a way that the compiler knows, if this assertion did not fail, then the value passed to it is known to not benull. More information about nullable reference typesTargetFrameworkis set tonet8.0(which is the latest LTS build as of the writing of this document). More information about target frameworksWe have included three package references:
xunitis the core package needed to write unit tests for xUnit.net v2xunit.runner.visualstudioandMicrosoft.NET.Test.Sdkare used to enable support for VSTest-based runners, likedotnet testand Visual Studio Test Explorer
A single unit test was also generated (UnitTest1.cs in this example):
namespace MyFirstUnitTests;

public class UnitTest1
{
    [Fact]
    public void Test1()
    {

    }
}
Now let's verify that everything is working by running our tests with dotnet test:
$ dotnet test
Restore complete (0.1s)
  MyFirstUnitTests succeeded (0.1s) → bin\Debug\net8.0\MyFirstUnitTests.dll
[xUnit.net 00:00:00.00] xUnit.net VSTest Adapter v3.1.1+bf6400fd51 (64-bit .NET 8.0.17)
[xUnit.net 00:00:00.03]   Discovering: MyFirstUnitTests
[xUnit.net 00:00:00.05]   Discovered:  MyFirstUnitTests
[xUnit.net 00:00:00.06]   Starting:    MyFirstUnitTests
[xUnit.net 00:00:00.08]   Finished:    MyFirstUnitTests
  MyFirstUnitTests test succeeded (0.4s)

Test summary: total: 1, failed: 0, succeeded: 1, skipped: 0, duration: 0.4s
Build succeeded in 0.9s
Excellent! Let's go replace that sample unit test with our first real tests.
Write your first tests
Using your favorite text editor, open the UnitTest1.cs file and replace the existing test with two new ones:
namespace MyFirstUnitTests;

public class UnitTest1
{
    [Fact]
    public void PassingTest()
    {
        Assert.Equal(4, Add(2, 2));
    }

    [Fact]
    public void FailingTest()
    {
        Assert.Equal(5, Add(2, 2));
    }

    int Add(int x, int y)
    {
        return x + y;
    }
}
If we run the tests again, we should see something like this:
$ dotnet test
Restore complete (0.1s)
  MyFirstUnitTests succeeded (0.2s) → bin\Debug\net8.0\MyFirstUnitTests.dll
[xUnit.net 00:00:00.00] xUnit.net VSTest Adapter v3.1.1+bf6400fd51 (64-bit .NET 8.0.17)
[xUnit.net 00:00:00.03]   Discovering: MyFirstUnitTests
[xUnit.net 00:00:00.05]   Discovered:  MyFirstUnitTests
[xUnit.net 00:00:00.06]   Starting:    MyFirstUnitTests
[xUnit.net 00:00:00.08]     MyFirstUnitTests.UnitTest1.FailingTest [FAIL]
[xUnit.net 00:00:00.08]       Assert.Equal() Failure: Values differ
[xUnit.net 00:00:00.08]       Expected: 5
[xUnit.net 00:00:00.08]       Actual:   4
[xUnit.net 00:00:00.08]       Stack Trace:
[xUnit.net 00:00:00.08]         UnitTest1.cs(14,0): at MyFirstUnitTests.UnitTest1.FailingTest()
[xUnit.net 00:00:00.08]   Finished:    MyFirstUnitTests
  MyFirstUnitTests test failed with 1 error(s) (0.5s)
    UnitTest1.cs(14): error TESTERROR:
      MyFirstUnitTests.UnitTest1.FailingTest (< 1ms): Error Message: Assert.Equal() Failure: Values differ
      Expected: 5
      Actual:   4
      Stack Trace:
         at MyFirstUnitTests.UnitTest1.FailingTest() in UnitTest1.cs:line 14

Test summary: total: 2, failed: 1, succeeded: 1, skipped: 0, duration: 0.4s
Build failed with 1 error(s) in 1.0s
We can see that we have one passing test, and one failing test. That's exactly what we would expect given what we wrote.
Now that we're gotten our first tests to run, let's introduce one more way to write tests: using theories.
Write your first theory
You may have wondered why your first unit tests use an attribute named [Fact] rather than one with a more traditional name like Test. xUnit.net includes support for two different major types of unit tests: facts and theories. When describing the difference between facts and theories, we like to say:
Facts are tests which are always true. They test invariant conditions.
Theories are tests which are only true for a particular set of data.
A good example of this is testing numeric algorithms. Let's say you want to test an algorithm which determines whether a number is odd or not. If you're writing the positive-side tests (odd numbers), then feeding even numbers into the test would cause it fail, and not because the test or algorithm is wrong.
Let's add a theory to our existing facts (including a bit of bad data, so we can see it fail):
[Theory]
[InlineData(3)]
[InlineData(5)]
[InlineData(6)]
public void MyFirstTheory(int value)
{
    Assert.True(IsOdd(value));
}

bool IsOdd(int value)
{
    return value % 2 == 1;
}
This time when we run our tests, we see a second failure, for our theory that was given 6:
$ dotnet test
Restore complete (0.1s)
  MyFirstUnitTests succeeded (0.2s) → bin\Debug\net8.0\MyFirstUnitTests.dll
[xUnit.net 00:00:00.00] xUnit.net VSTest Adapter v3.1.1+bf6400fd51 (64-bit .NET 8.0.17)
[xUnit.net 00:00:00.03]   Discovering: MyFirstUnitTests
[xUnit.net 00:00:00.05]   Discovered:  MyFirstUnitTests
[xUnit.net 00:00:00.06]   Starting:    MyFirstUnitTests
[xUnit.net 00:00:00.08]     MyFirstUnitTests.UnitTest1.MyFirstTheory(value: 6) [FAIL]
[xUnit.net 00:00:00.09]       Assert.True() Failure
[xUnit.net 00:00:00.09]       Expected: True
[xUnit.net 00:00:00.09]       Actual:   False
[xUnit.net 00:00:00.09]       Stack Trace:
[xUnit.net 00:00:00.09]         UnitTest1.cs(28,0): at MyFirstUnitTests.UnitTest1.MyFirstTheory(Int32 value)
[xUnit.net 00:00:00.09]     MyFirstUnitTests.UnitTest1.FailingTest [FAIL]
[xUnit.net 00:00:00.09]       Assert.Equal() Failure: Values differ
[xUnit.net 00:00:00.09]       Expected: 5
[xUnit.net 00:00:00.09]       Actual:   4
[xUnit.net 00:00:00.09]       Stack Trace:
[xUnit.net 00:00:00.09]         UnitTest1.cs(14,0): at MyFirstUnitTests.UnitTest1.FailingTest()
[xUnit.net 00:00:00.09]   Finished:    MyFirstUnitTests
  MyFirstUnitTests test failed with 2 error(s) (0.5s)
    UnitTest1.cs(28): error TESTERROR:
      MyFirstUnitTests.UnitTest1.MyFirstTheory(value: 6) (< 1ms): Error Message: Assert.True() Failure
      Expected: True
      Actual:   False
      Stack Trace:
         at MyFirstUnitTests.UnitTest1.MyFirstTheory(Int32 value) in UnitTest1.cs:line 28
    UnitTest1.cs(14): error TESTERROR:
      MyFirstUnitTests.UnitTest1.FailingTest (< 1ms): Error Message: Assert.Equal() Failure: Values differ
      Expected: 5
      Actual:   4
      Stack Trace:
         at MyFirstUnitTests.UnitTest1.FailingTest() in UnitTest1.cs:line 14

Test summary: total: 5, failed: 2, succeeded: 3, skipped: 0, duration: 0.5s
Build failed with 2 error(s) in 1.1s
Although we've only written 3 test methods, the test runner actually ran 5 tests; that's because each theory with its data set is a separate test. Note also that the runner tells you exactly which set of data failed, because it includes the parameter values in the name of the test.
Using Visual Studio
Note
These screen shots were taken with Visual Studio 2022 version 17.14.5. Your screen may look slightly different if you have a newer version. The latest version of Visual Studio 2022 also supports Microsoft Testing Platform (which is natively implemented in xUnit.net v3), so the instructions to add the xunit.runner.visualstudio and Microsoft.NET.Test.Sdk packages may not be necessary.
Visual Studio contains a test runner called Test Explorer that can run unit tests from a variety of third party test frameworks, including xUnit.net. The inclusion of xunit.runner.visualstudio (and Microsoft.NET.Test.Sdk) allows Test Explorer to find and run our tests.
Visual Studio works on solutions rather than projects. If your project doesn't have a solution file yet, you can use the .NET SDK to create one. Run the following two commands from your project folder:
$ dotnet new sln
The template "Solution File" was created successfully.

$ dotnet sln add .
Project `MyFirstUnitTests.csproj` added to the solution.
Now open your solution with Visual Studio. Build your solution after it has opened. Make sure Test Explorer is visible (go to Test > Test Explorer).
Via Test Explorer
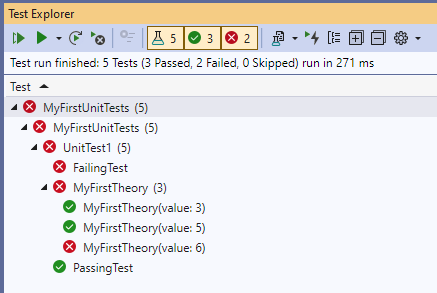
After a moment of discovery, you should see the list of discovered tests:
![]()
By default, the test list is arranged by project, namespace, class, and finally test method. In this case, the MyFirstTheory method shows 3 sub-items, as that is a data theory with 3 data rows.
Clicking the run button (the double play button) in the Test Explorer tool bar will run your tests:
You can double click on any test in the list to be taken directly to the source code for the test in question.
Via source code
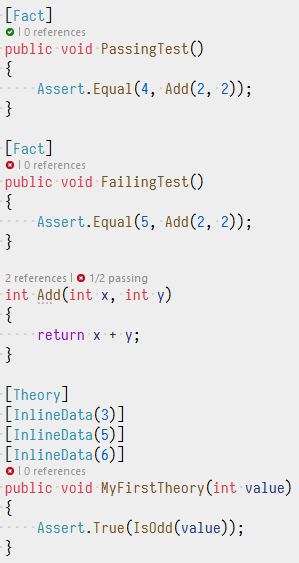
You should notice after the build is complete that your unit test source becomes decorated with small blue i icons that indicate that there is a runnable test:
![]()
Clicking the i will pop up a panel that will allow you to Run or Debug your tests, as well as navigate to the test inside Test Explorer. After running the tests, you'll see that the icons now change to indicate which tests are currently passing vs. failing:
Using Visual Studio Code
Note
These screen shots were taken with Visual Studio Code version 1.101.2 and C# Dev Kit extension version 1.30.32. Your screen may look slightly different if you have newer versions. The latest version of C# Dev Kit also supports Microsoft Testing Platform (which is natively implemented in xUnit.net v3), so the instructions to add the xunit.runner.visualstudio and Microsoft.NET.Test.Sdk packages may not be necessary. You may need to enable MTP support by setting "dotnet.testWindow.useTestingPlatformProtocol": true in your VS Code configuration file.
To be able to build C# test projects and run their tests, install the C# Dev Kit extension into Visual Studio Code. The inclusion of xunit.runner.visualstudio (and Microsoft.NET.Test.Sdk) allows the Visual Studio Code testing panel (and the C# extension) to find and run our tests.
From the command prompt, open Visual Studio code on your project folder by running: code .
Using the side bar on the left, click the Explorer side bar (it's probably already selected by default), and make sure Solution Explorer is visible. You should see something like this:

To build your project, right click on "MyFirstUnitTests" and choose "Build".
Via Testing side bar
Once the project has finished building, click on the Testing panel. After a moment of discovery, you should see the list of discovered tests:
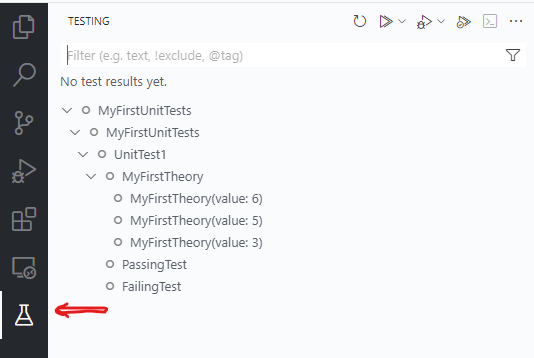
By default, the test list is arranged by project, namespace, class, and finally test method. In this case, the MyFirstTheory method shows 3 sub-items, as that is a data theory with 3 data rows.
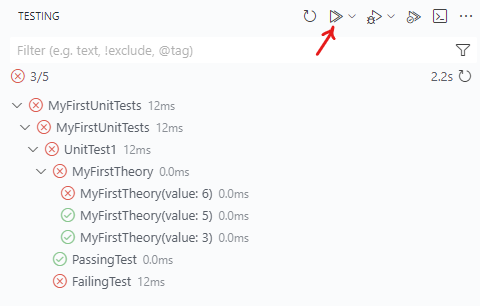
Clicking the run button (the double play button) in the Testing panel tool bar will run your tests:
You can double click on any test in the list to be taken directly to the source code for the test in question.
Via source code
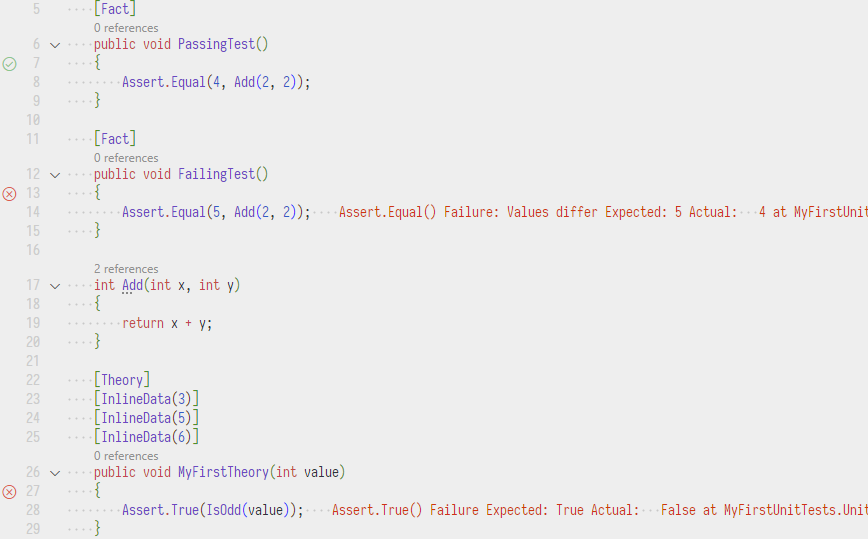
Once the project has finished building, you should notice that your unit test source becomes decorated with play icons that you can click to run your tests:
![]()
After running the tests, you'll see that the icons now change to indicate which tests are currently passing vs. failing, and failed tests will include failure information inline with your source code:
Using JetBrains Rider
Note
These screen shots were taken with Rider 2024.2. Your screen may look slightly different if you have a newer version. The latest version of Rider supports Microsoft Testing Platform (which is natively implemented in xUnit.net v3), so the instructions to add the xunit.runner.visualstudio and Microsoft.NET.Test.Sdk packages may not be necessary.
Rider contains a Tests tool window that can run tests from a variety of third party test frameworks, including xUnit.net. The inclusion of xunit.runner.visualstudio (and Microsoft.NET.Test.Sdk) allows the Tests tool window to find and run our tests.
Open your project in Rider. Build the project by right clicking on it and choosing "Build Selected Projects".
Via Tests tool window
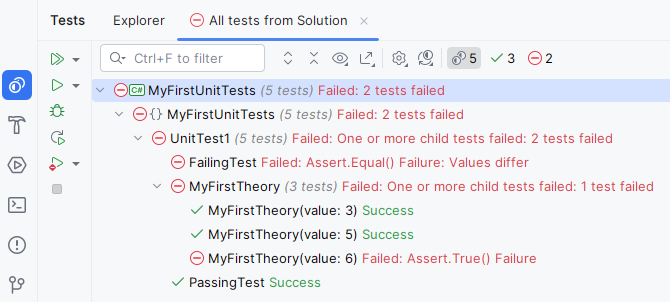
Once the project has finished building, click on the Tests tool window. After a moment of discovery, you should see the list of discovered tests:
![]()
By default, the test list is arranged by project, namespace, class, and finally test method.
Clicking the run button (the double play button) in the Tests tool window will run your tests:
You can double click on any test in the list to be taken directly to the source code for the test in question.
Via source code
Once the project has finished building, you should notice that your unit test source becomes decorated with play icons that you can click to run your tests:
![]()
After running the tests, you'll see that the icons now change to indicate which tests are currently passing vs. failing:
