Code Coverage with MTP 2026 August 21
With the new Microsoft Testing Platform support (MTP) in xUnit.net v3, getting code coverage has changed when running with MTP. This document discusses how to enable code coverage for both the MTP native command line via dotnet run as well as when using dotnet test.
Note
The samples here are done with xUnit.net v3 4.0.0 and .NET SDK 10.0.400. Your output text or version numbers may look slightly different from the examples given here.
Setting up a sample project
We're going to walk through a simple sample project so we can see code coverage in action with MTP. These quick instructions will assume you're comfortable using the command line .NET SDK tooling.
If you want to skip these steps and just download the sample project, it's available as a ZIP file.
If you have not already installed the v3 templates, please do so now:
dotnet new install xunit.v3.templatesThe following template packages will be installed: xunit.v3.templates Success: xunit.v3.templates@4.0.0 installed the following templates: Template Name Short Name Language Tags ------------------------------ ---------------- ---------- ---------------------- xUnit.net v3 Extension Project xunit3-extension [C#],F#,VB Test/xUnit xUnit.net v3 Test Project xunit3 [C#],F#,VB Test/xUnit/Desktop/WebCreate a folder for our sample project, and create our solution file:
mkdir CodeCoverageSamplecd CodeCoverageSampledotnet new slnThe template "Solution File" was created successfully.Create a class library and add it to the solution:
dotnet new classlib -f net10.0 -o ClassLibraryThe template "Class Library" was created successfully. Processing post-creation actions... Restoring ClassLibrary\ClassLibrary.csproj: Restore succeeded.dotnet sln add ClassLibraryProject `ClassLibrary\ClassLibrary.csproj` added to the solution.Replace the contents of
ClassLibrary\Class1.cswith the following:namespace ClassLibrary; public class Class1 { public static int Add(int x, int y) => x + y; public static int Subtract(int x, int y) => x - y; }This will give us code for us to measure coverage against.
Create the unit test project, add it to the solution, and add a reference to the class library:
dotnet new xunit3 -f net10.0 -o Tests --command-line mtpThe template "xUnit.net v3 Test Project" was created successfully. Processing post-creation actions... Restoring Tests\Tests.csproj: Restore succeeded.dotnet sln add TestsProject `Tests\Tests.csproj` added to the solution.dotnet add Tests reference ClassLibraryReference `..\ClassLibrary\ClassLibrary.csproj` added to the project.Replace the contents of
Tests\UnitTest1.cswith the following:using ClassLibrary; public class UnitTest1 { [Fact] public void AddTest() { Assert.Equal(5, Class1.Add(2, 3)); } }With all of this done, let's ensure that our tests are able to run, and that we're in MTP mode. Let's start with
dotnet test:dotnet testRunning tests from Tests\bin\Debug\net10.0\Tests.dll (net10.0|x64) Tests\bin\Debug\net10.0\Tests.dll (net10.0|x64) passed (198ms) Test run summary: Passed! total: 1 failed: 0 succeeded: 1 skipped: 0 duration: 330msYou can also use
dotnet run:dotnet run --project TestsxUnit.net v3 Microsoft.Testing.Platform v2 Runner v4.0.0+8bf043c053 (64-bit .NET 10.0.11) Test run summary: Passed! - Tests\bin\Debug\net10.0\Tests.dll (net10.0|x64) total: 1 failed: 0 succeeded: 1 skipped: 0 duration: 161ms
Enabling code coverage
With xUnit.net v3 and MTP, there is a solution for code coverage that's supported directly by Microsoft.
One of the big new features for MTP is for the ability of developers to write "extensions" that can extend the functionality of unit testing frameworks by mixing in functionality via custom command line options. The documentation page for MTP extensions is a good place to start when looking for these extensions.
Today we're focusing on the Microsoft Code Coverage extension. To use this extension, we must add a package reference like this:
dotnet add Tests package Microsoft.Testing.Extensions.CodeCoverage
info : X.509 certificate chain validation will use the default trust store selected by .NET for code signing.
info : X.509 certificate chain validation will use the default trust store selected by .NET for timestamping.
info : Adding PackageReference for package 'Microsoft.Testing.Extensions.CodeCoverage' into project 'Tests\Tests.csproj'.
info :   GET https://api.nuget.org/v3/registration5-gz-semver2/microsoft.testing.extensions.codecoverage/index.json
info :   OK https://api.nuget.org/v3/registration5-gz-semver2/microsoft.testing.extensions.codecoverage/index.json 170ms
info : Restoring packages for Tests\Tests.csproj...
info :   CACHE https://api.nuget.org/v3/vulnerabilities/index.json
info :   CACHE https://api.nuget.org/v3-vulnerabilities/2026.08.20.05.43.44/vulnerability.base.json
info :   CACHE https://api.nuget.org/v3-vulnerabilities/2026.08.20.05.43.44/2026.08.21.11.43.50/vulnerability.update.json
info : Package 'Microsoft.Testing.Extensions.CodeCoverage' is compatible with all the specified frameworks in project 'Tests\Tests.csproj'.
info : PackageReference for package 'Microsoft.Testing.Extensions.CodeCoverage' version '18.10.0' added to file 'Tests\Tests.csproj'.
info : Generating MSBuild file Tests\obj\Tests.csproj.nuget.g.props.
info : Generating MSBuild file Tests\obj\Tests.csproj.nuget.g.targets.
info : Writing assets file to disk. Path: Tests\obj\project.assets.json
log  : Restored Tests\Tests.csproj (in 101 ms).
Once this reference has been added, we can see that four new command line switches have become available to us:
dotnet test -?
[...]
  --coverage                       Collect the code coverage using dotnet-coverage tool.
  --coverage-output                The output of the generated code coverage report.
                                   If only filename is specified then the coverage report will be generated in the '--results-directory' directory.
  --coverage-output-format         Output file format. Supported values: 'coverage', 'xml' and 'cobertura'
  --coverage-settings              The path to the code coverage XML settings file.
[...]
Passing --coverage is the minimum requirement for enabling code coverage; the other three switches influence how the coverage information is reported.
Note
The --coverage-settings is a path to the .runsettings file relative from your test project. Alternatively, you could use a full path to the .runsettings file. For example, for your GitHub Actions command you could use a command like this:
dotnet test --coverage --coverage-settings '${{ github.workspace }}/src/.runsettings'
Generating code coverage XML
Using dotnet test
Let's run our test project with coverage enabled, and ensure that it's generating XML formatted results for our report generator.
dotnet test --coverage --coverage-output-format cobertura
Running tests from Tests\bin\Debug\net10.0\Tests.dll (net10.0|x64)
Tests\bin\Debug\net10.0\Tests.dll (net10.0|x64) passed (299ms)

  In process file artifacts produced:
    - TestResults\d7aaf428-827a-47b2-933b-00008b507595.cobertura.xml

Test run summary: Passed!
  total: 1
  failed: 0
  succeeded: 1
  skipped: 0
  duration: 709ms
If you run dotnet test and it runs multiple test projects, each test project will have a unique report file in the TestResults folder.
Note
You should not use the --coverage-output command line switch when dotnet test runs multiple test projects, because each test project's report will overwrite the previous test project. Allow dotnet test to assign unique filenames automatically for you, and then use wildcards to find the resulting files.
The output now shows the XML file that's been generated with code coverage information. If we peek at the first few lines of the XML file we should see coverage information like this:
[...]
<class line-rate="0.5" branch-rate="1" complexity="1" name="ClassLibrary.Class1" filename="ClassLibrary\Class1.cs">
  <methods>
    <method line-rate="1" branch-rate="1" complexity="1" name="Add" signature="(int, int)">
      <lines>
        <line number="6" hits="1" branch="False" />
      </lines>
    </method>
    <method line-rate="0" branch-rate="1" complexity="1" name="Subtract" signature="(int, int)">
      <lines>
        <line number="9" hits="0" branch="False" />
      </lines>
    </method>
  </methods>
  <lines>
    <line number="6" hits="1" branch="False" />
    <line number="9" hits="0" branch="False" />
  </lines>
</class>
[...]
Using dotnet run
Generating coverage XML is very similar to using dotnet test, except that we pass the extra arguments to dotnet run instead:
dotnet run --project Tests -- --coverage --coverage-output-format cobertura
xUnit.net v3 Microsoft.Testing.Platform v2 Runner v4.0.0+8bf043c053 (64-bit .NET 10.0.11)

  In process file artifacts produced:
    - Tests\bin\Debug\net10.0\TestResults\39dd3f87-5c03-4162-a6a9-9213606a349f.cobertura.xml

Test run summary: Passed! - Tests\bin\Debug\net10.0\Tests.dll (net10.0|x64)
  total: 1
  failed: 0
  succeeded: 1
  skipped: 0
  duration: 218ms
Using ReportGenerator to create HTML from the XML
The XML isn't particularly pretty to look at, so for human consumption we can generate HTML reports.
We'll use a tool called ReportGenerator to convert the XML coverage into HTML reports. If you don't already have this installed, you can run this command:
dotnet tool install --global dotnet-reportgenerator-globaltool
You can invoke the tool using the following command: reportgenerator
Tool 'dotnet-reportgenerator-globaltool' (version '5.5.11') was successfully installed.
Now we just need to generate the HTML report:
reportgenerator -reports:**/*.cobertura.xml -targetdir:CoverageReport
2026-08-21T14:34:49: Arguments
2026-08-21T14:34:49:  -reports:**/*.cobertura.xml
2026-08-21T14:34:49:  -targetdir:CoverageReport
2026-08-21T14:34:49: Writing report file 'CoverageReport\index.html'
2026-08-21T14:34:49: Report generation took 0.1 seconds
If you open the index.html file in your browser you should see a report that looks something like this:
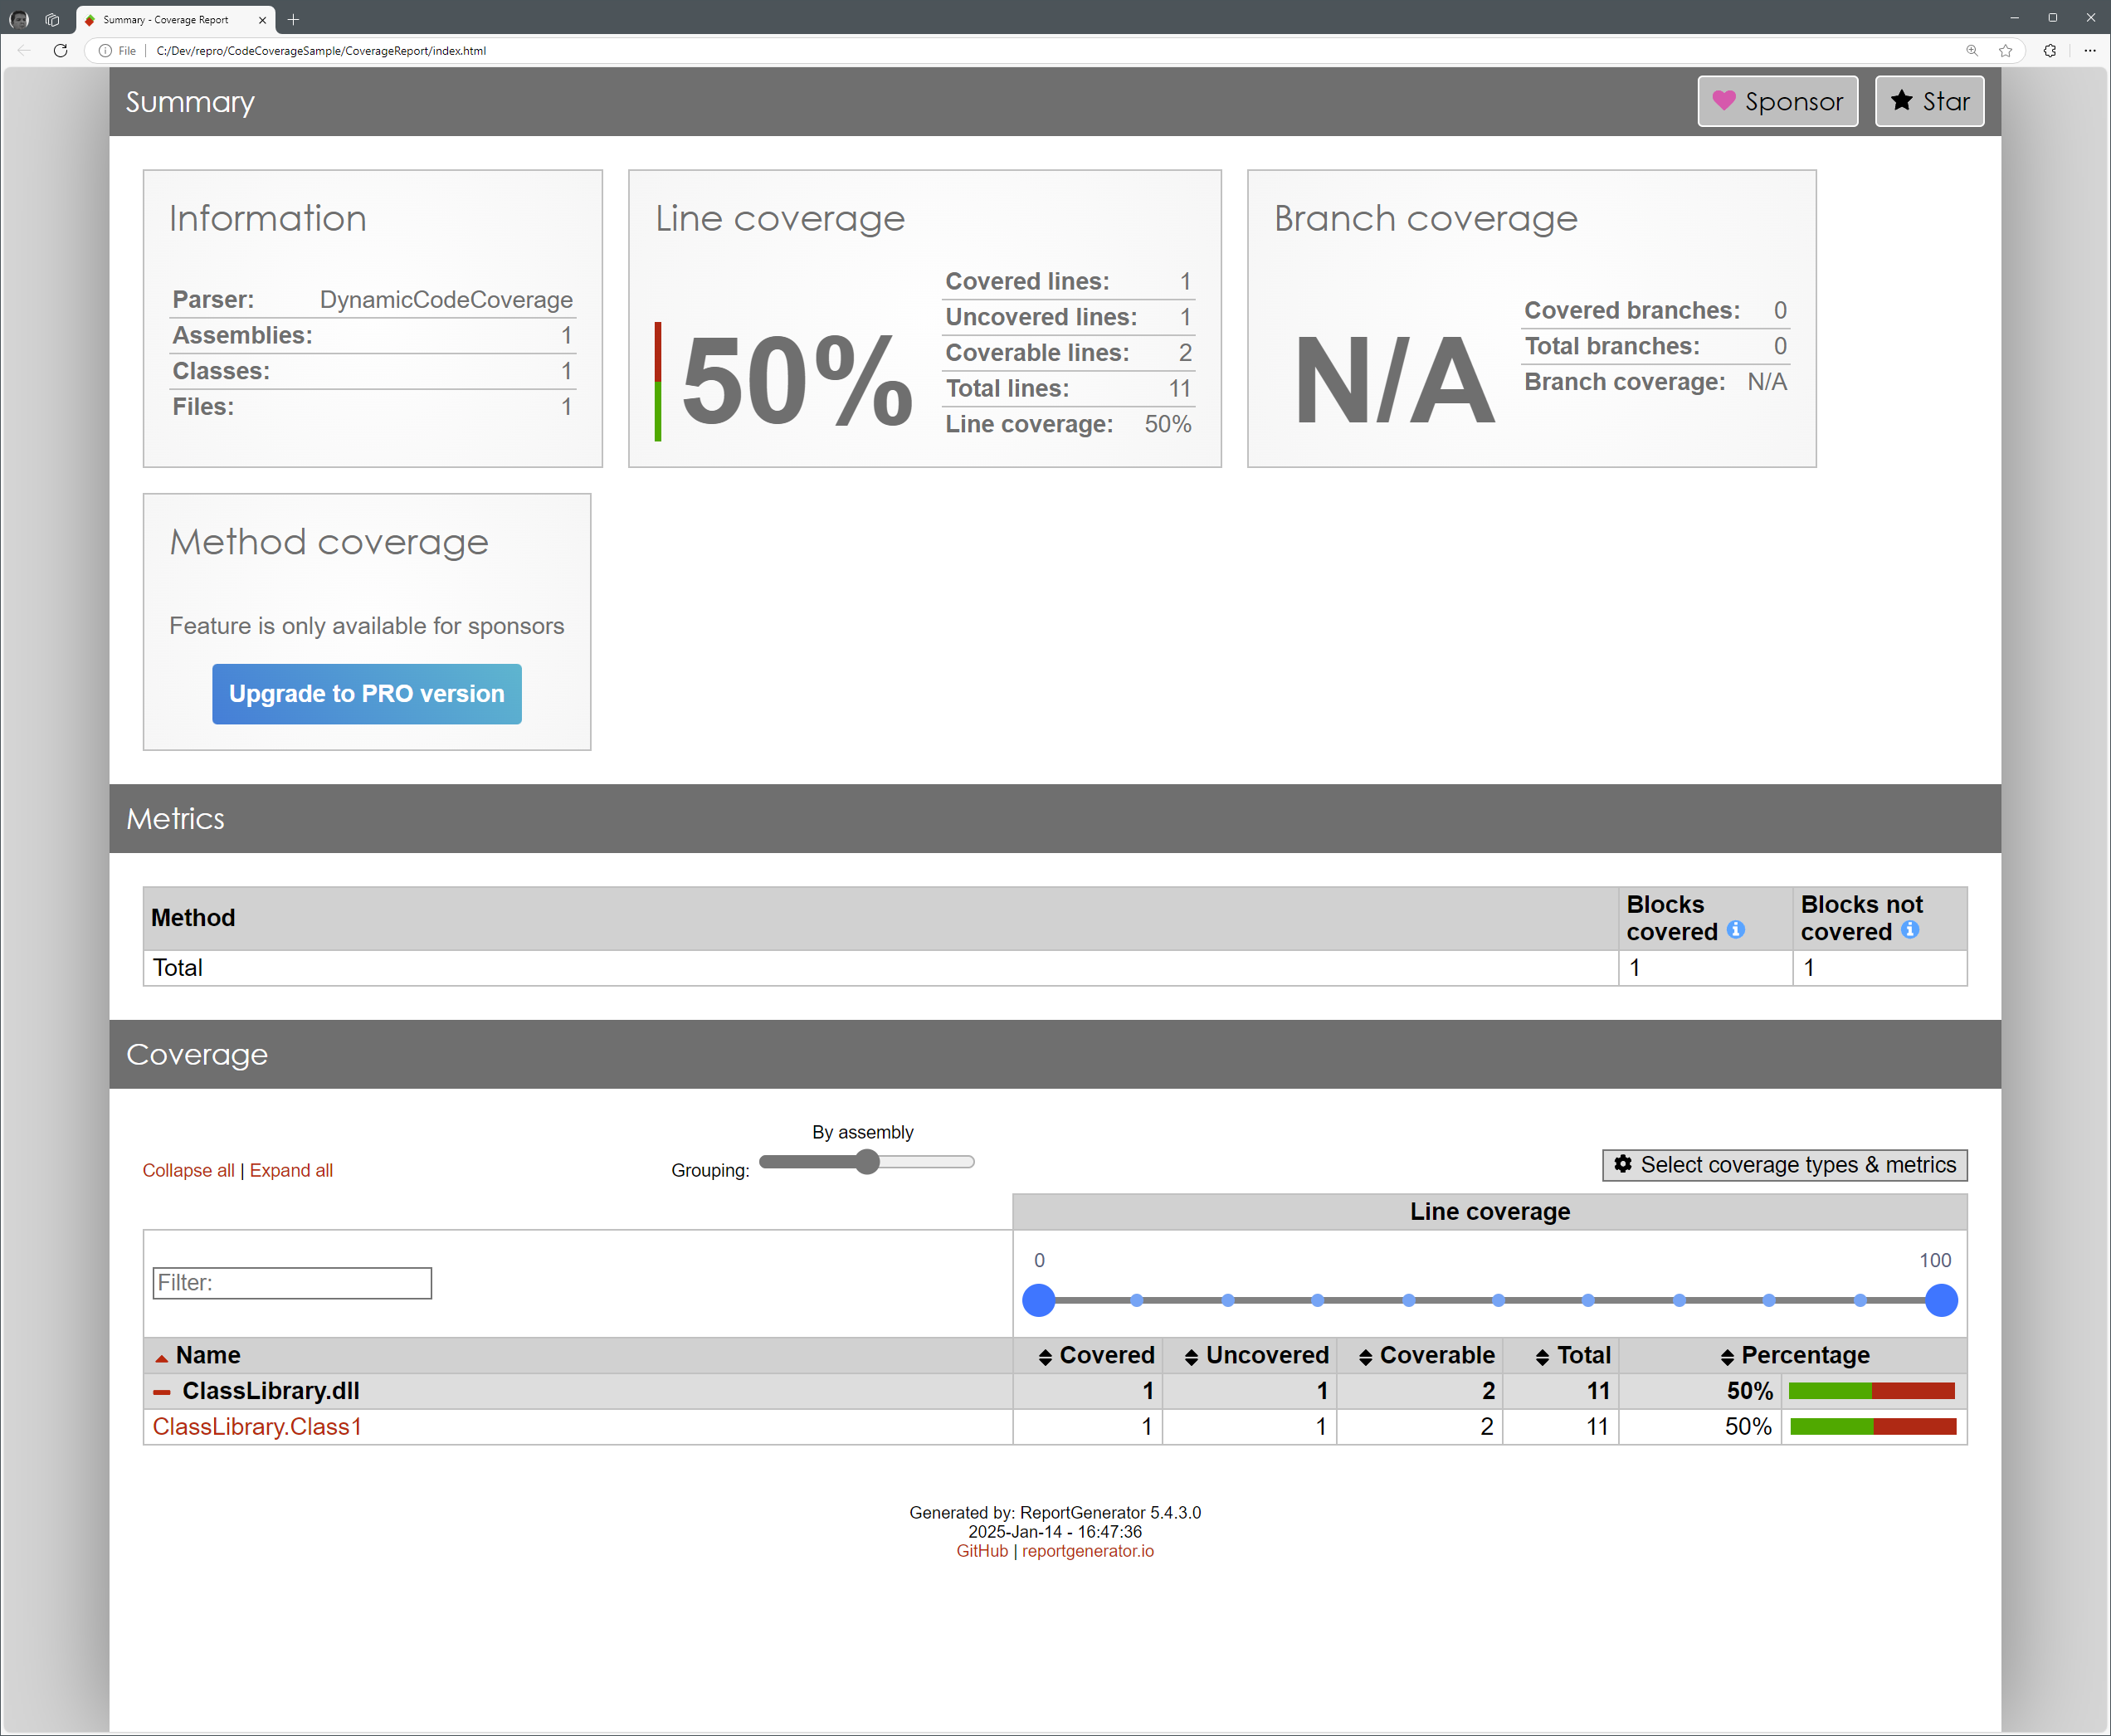
You can click on the ClassLibrary.Class1 to dive into the coverage details:
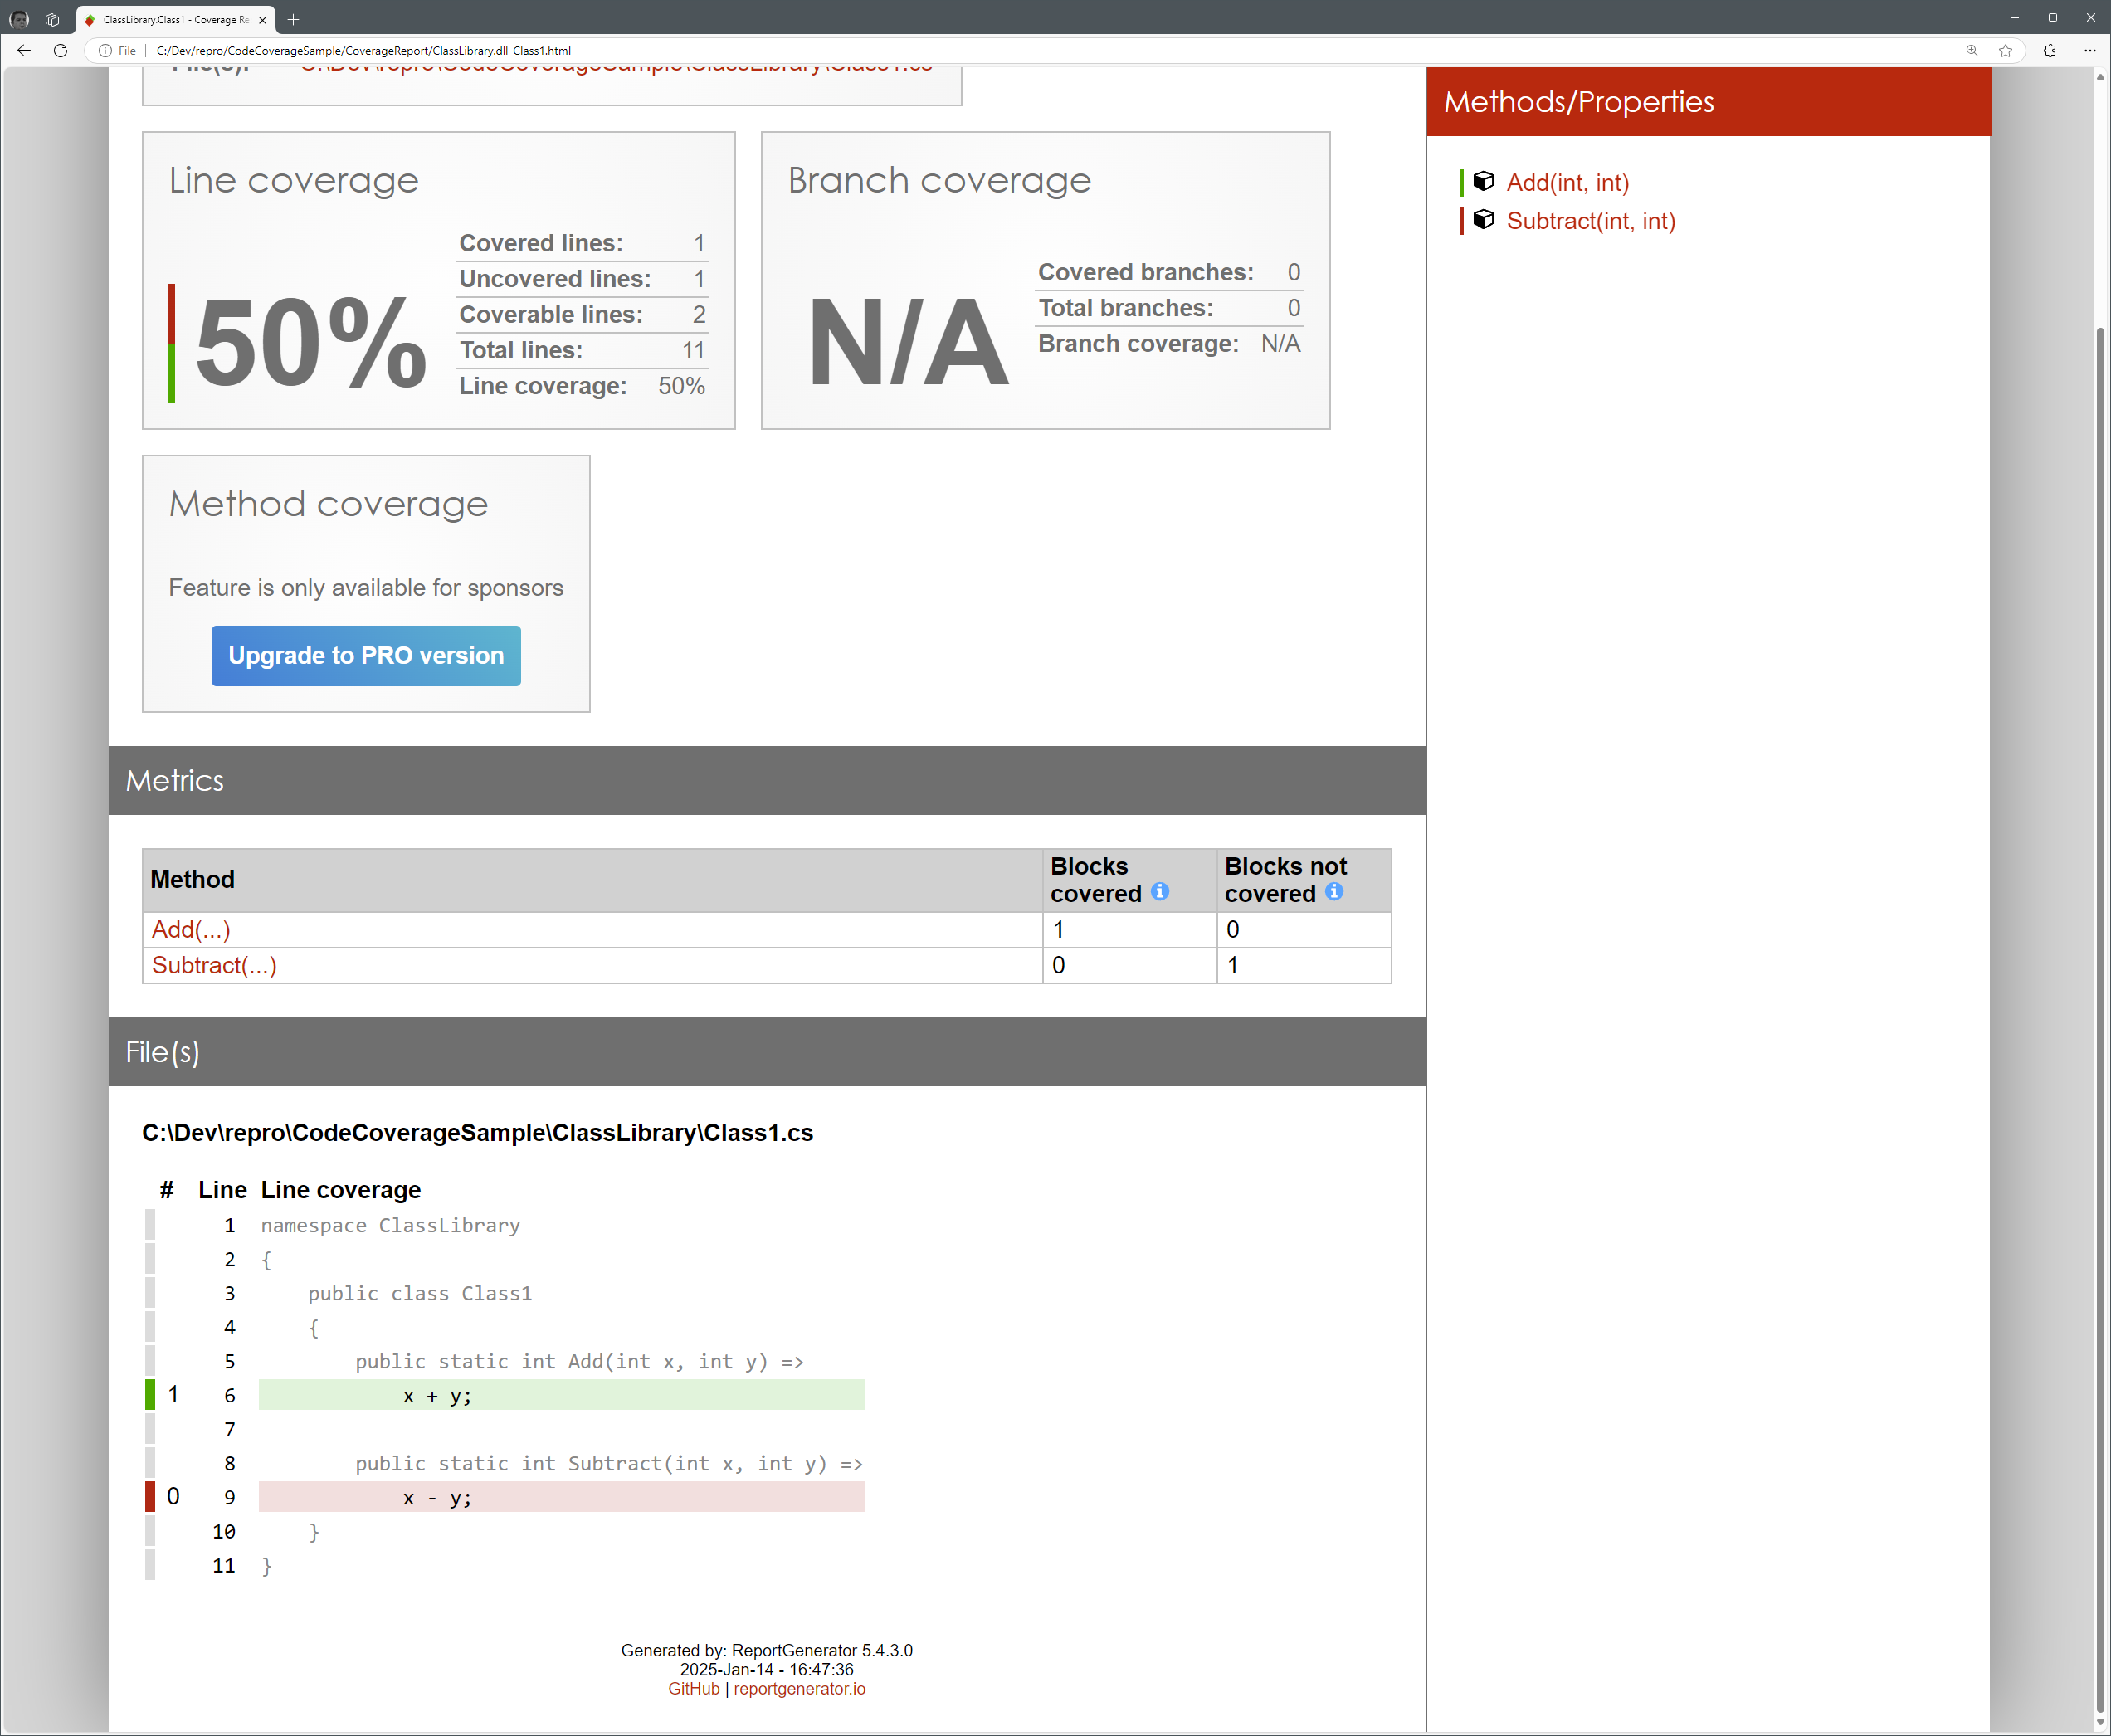
Code coverage is showing us that our test have only covered the Add method, and not the Subtract method, which is correct given that our unit test sample only included a single test for Add.
At this point, you should be able to write a second test for Subtract, re-run the tests (with coverage), re-generate the report, and see the updated code coverage results.