Getting Test Results in Azure DevOps Pipelines
Referencing the Visual Studio adapter
- Using NuGet Package Manager (or Package Manager Console), add
xunit.runner.visualstudioto at least one of your test projects.install-package xunit.runner.visualstudio
Configure Azure DevOps
- Add a build step of type
Visual Studio Test.
These instructions are written for Version 2.* of the Visual Studio Test task.
Locate test assemblies
Under
Test selection/Test files, point to your generated test assemblies, for example:**\bin\$(BuildConfiguration)\**\*.tests.dll !**\obj\** !**\ref\**Note: it is important to make sure the file matching pattern is valid. You may need to add additional exclusions if your chosen name pattern unintentionally matches other files in your output folder(s).
testVerAssemblyVer2must be expressed with newlines. vsts-doc issue 1580
Enable Code Coverage (optional)
Select the
Execution Options/Code Coverage Enabledcheckbox.Add
/InIsolationunderExecution options/Other console options. (This will suppress a warning otherwise generated.)
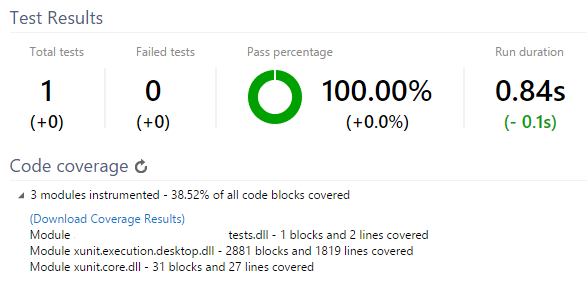
Viewing the results
After a successful build, the test results are available on the main view of the build. It should look something like this:
Comments
You no longer need to manually configure the test adapter path, because NuGet restored test adapters are automatically searched for.
If you see the warning message
Warning: System.AppDomainUnloadedException: Attempted to access an unloaded AppDomain. This can happen if the test(s) started a thread but did not stop it. Make sure that all the threads started by the test(s) are stopped before completion., please note that it is not related to Azure DevOps and does not affect the results. For more information, see issue 490 and MS Connect.